So here's my version of a galvanized tray.
Here's how I made the tray.
I got this round (whatever-you-call-this) at the hardware store. It cost $4.95 and it was a little dusty. I marked it in quarters with tape (since I couldn't see pencil marks).
I got out the drill and the bits. I had purchased handles at another store and I checked to see if the bit I chose would fit in the hole where the screw would go. I decided to use a bit that was a little on the small size knowing I could make the hole larger later if I needed to.
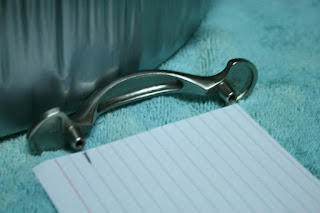
These are the handles I bought. I couldn't decide, so I bought these that weren't too shiny.
Now you don't know me, but I don't always measure the way some people do. I got an index card to mark the distance between the screw holes.
I then folded the card so it would be the distance I needed between the two holes I would drill. I thought that the card would conform to the side of the tray better than it would be for me to try to measure with a ruler.
I drew these arrows for you. You can see where I'm going to drill the holes. I also folded the card down the distance down from the top where I needed to drill the holes. The arrow pointing up is lined-up with one of the quarter tape marks I did at the beginning.
I found these little "collars" in with the nuts, bolts and screws. I decided to try them with the project.
They looked nice when they were used with the screws.
I think they gave the tray a more "finished" look.
Well, what do you think? I'm pretty happy with the results!
One of the neatest things I discovered was that the round place mats that I have (standard size) fit perfectly into the tray. I have several colors already and can change up the look of the tray in a flash.
And since I already had an extra set of handles, I went ahead and got another (whatever-it-is-called) and made a second tray in just a few minutes.
Pottery Barn $29.95 for round galvanized tray.
Marsha's under $10.00 for round galvanized tray.
Joining the Party at:


18 comments:
Such a clever idea to add the handles. Smart thinking!! Love it, I have one like that but it is granite ware, may have to copy your idea:)
Marsha- What a great looking project! You did good, girl...really really good! I do the same thing with the index cards-or sometimes I have been known to use a sheet of typing paper to mark out where I want something to go. Great minds think alike, huh? xo Diana
Well done!!! Love it. I just bookmarked this project and I'm your newest follower!
Wow! Marsha, you're really andy. I'll make one, it will be perfect for this summer.
go girl!!!
it's a fabulous design
You are so smart! I love it!
Wow! Marsha, congratulations on being featured on the "Sunday Showcase"! You are very deserving and creative. Thanks for all the great instructions on this fabulous project.
This is such a fabulous project! I would have never thought of this! I think we may need one of those little goodie over at our house!
Take care,
Trisha
Hi Marsha,
I love this idea! The trays turned out great and how great that the round placemats were a perfect fit. Nice job.
Hugs and Blessings,
♥Ana~A Petite Cottage
Nice job. I love galvanized pieces.
Wow! Turned out great :). Thanks for stopping by to see mine !
Way to use your noggin'!! You don't see round trays like that and your version is really nice!
Well, how smart are you. That looks great.
Okay, this is so very clever! Love the idea and love, love the price tag ...
Pottery Barn take that!
:)
Linda
This is such a great idea! Very clever. I'm always wanting to carry more than I should in one trip outside so this would help tremendously! Thanks for sharing!
Great Idea! I wouldn't have thought of adding the handles, and they completely transform it!
This will come in very handy this summer, too.
-Revi
You really duplicated the Pottery Barn item, Marsha! It's a fantastic copy and so very functional, as well as being cool. The industrial look is so much fun in all types of accessories and furniture. :-) Sue
What section in the hardware store was it? I'd like to track a few down and wonder where to look...
Post a Comment