I was to bring several tools and I decided at the last minute that I might need to be in charge of picking up donuts, too. I took orders over the phone.
The day was already wonderful! My donut is the chocolate one.
After breakfast, we got started with our project.
We checked to see how the pieces looked that we were going to use. We were very fortunate that Home Depot cut the boards for us. What a time-saver!
We moved the project outside to the porch. We could really spread out there. We didn't have to worry about saw dust getting everywhere, either!
We got started and I think I was charge (it's because I like power tools).
We had enough materials to make nine picture holders.
We have a friend who couldn't hang out with us--
don't tell her, but we're making one for her!!

We had enough materials to make nine picture holders.
We have a friend who couldn't hang out with us--
don't tell her, but we're making one for her!!

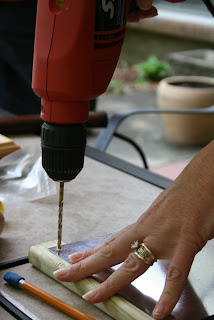
I tapped a little mark in the metal sheet before drilling the holes for the rivets.
I drilled the holes in each corner. I used a piece of extra wood under the metal so I could drill completely through the metal and not harm the table.
We decided to assemble one of the picture holders just to make sure that it wouldn't be too top-heavy. Seeing that all was well, we continued to drill pieces in an assembly line. The metal sheets were matched with the wooden boards to make sure that the holes lined up.
I drilled holes in all the bases, too.
We had to stop and get our children from school because they were dismissed early due to the inclement weather we were expecting.
After we got them back to the house, we started painting.
My friend decided on this lovely turquoise color.
She will use this picture holder at her lake house.

I decided on this red.
It will be great for Christmas, band pictures,
4th of July and Valentine's Day photos.
We packed everything up when the first (of MANY) tornado sirens sounded.
When we got home, I decided to make a pizza.
I had seen a recipe for home-made pizza dough that I wanted to try.
I'm not very good with yeast, but I did a great job on this dough!
I cooked (and shredded) chicken breasts with garlic and then caramelized some onions with a few mushrooms. I used a little sauce with basil. Then, I added fresh basil and oregano and two cups of cheese! It was a great pizza!
I painted the remainder of my pieces after dinner.
Saturday afternoon, I distressed the edges and rubbed on a little bit of darker paint for a contrast in the areas that I had sanded free of the red paint.
I sealed all the pieces with a coat of semi-gloss spray.
Then I put all the pieces together.
Here's the finished product! What do you think??

Linking up with the party at:


3 comments:
I came here from Lettered Cottage link party - this looks like a fun project, I think these would make great gifts! Thanks for the idea!
They are fun and easy to make. I've made more since the day we made the ones in the post. It's nice to have them in different colors to match other decorations in your room.
This is such a cute project! I can see several of different heights grouped together. thanks for joining my party.
xo,
Sherry
Post a Comment