.

.

Thursday, December 20, 2012

White Christmas Coffee Table

     I've never had a white Christmas. 
                                     I think it would be very pretty.

Here's my coffee table this year.  My White Christmas coffee table--my gift of snow to my family.  I was very pleased with the way it turned out.  It was exactly the way I had imagined it in my mind. Sometimes things turn out that way, and well, sometimes they don't.


When I saw the icy sticks covered with snow at Michael's in the floral department awhile back, I really liked them and began to think about how I could use them in my home.  I guess the next day, I found this picture of my great-aunt's home. It was a wonderfully snowy day when the picture was made. It didn't have the year noted, but her home was built in the 1930's. 


I purchased this faux tarnished trophy on line this summer and by the time I received it,
 I felt silly about the purchase and when it arrived, I put it in the closet.
  BUT, as I began to think about the snowy sticks and the picture of
my aunt's house, it wasn't very long before the vintage-style trophy came to mind. 


I purchased several branches of greenery and the snowy sticks at my Michael's
and made the arrangement.  I put some styrofoam in the base of the container--
that helped keep the greenery in place.


I use this white column piece a lot.  It came from the house in the picture.
  I use it often and it was perfect for my plan.  I added a bow,
 a shiny ball and a shape cut from an old dictionary page and that was done.


Next, I added my little white chippy bird and then remembered
 the books of piano music a friend gave me.  I was thrilled
 that there were Christmas songs in the books,
so I tore out one of my favorite Christmas hymns.


Then I added a piece of antique lace, a mercury glass candle
 holder and a spray of the snow-covered greenery.


The last item I added was this vintage Christmas post card. 
 I only have the one and it was perfect addition for my table.


A Merry White Christmas !


Monday, August 13, 2012

Adult Grilled Cheese

We had a wonderful visit with friends at Seaside and Seagrove, Florida this summer.  Everything is fun and exciting when you go to the beach!  Especially when you share it with friends.
Another thing I love about visiting this area are the Airstream food trucks of Seaside.  I had the opportunity to eat at the Airstream food trucks two times during our visit.  Both times, I got a sandwich at The Melt Down on 30A.  Who wouldn't love a day at the beach, sunning, shopping and then a delicious grilled cheese sandwich?  AND have it served to you in a brown paper bag--just like a kid's sack lunch from years ago.

I knew I wanted to make these delicious sandwiches
 at home, so here is my first sandwich from The Melt Down.
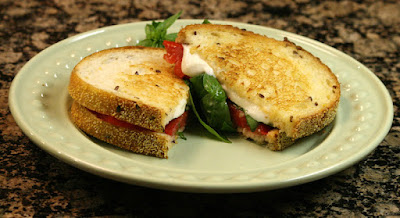
The Mozzarella, Tomato and Basil grilled cheese.

Oh my goodness!  Such fresh and simple favors of summer all in one delicious sandwich!

Here's what you'll need:

2 slices Italian bread (I used Publix's 5 grain Italian)
fresh mozzarella
fresh basil leaves
fresh tomato slices
butter
 
I used a non-stick skillet with a little pat of butter in it.
Then, I placed in the pan one piece of bread topped with a generous slice of fresh
 mozzarella cheese so it could start melting.
I heated the bread and cheese low and slow and got the other
 ingredients ready at the same time. 
I prepped my fresh basil-washed it and patted it dry.
I sliced the tomato.


Here's the menu of delicious sandwiches at The Melt Down.

When the first side of the sandwich was golden brown,
 I put the basil leaves on top of the melting cheese.
  I placed the other slice of bread on top and gave it a little pat of butter, too. 
 I flipped the sandwich so the other side could start to brown. When the other 
 side of the bread was brown, I removed it from the pan and placed it on my plate. 
 I opened the sandwich up and placed the tomato slices
 inside and gave them a dash of salt and pepper.
I then returned to top slice of bread to the sandwich. 
 And, to make sure everything was extra gooey,
 I microwaved the sandwich for 20 seconds.
Here are the results!


Yummy Summer Goodness--
An adult grilled cheese!
Fresh mozzarella, basil and tomato grilled cheese.


The Post Office at Seaside, Florida.


The different Airstream food trucks at Seaside, Florida offer ice cream,
grilled cheese, hot dogs, bar-b-que and delightful raw offerings.


I think I've brought home a
 great souvenir from our summer vacation.

Joining the party:


Thursday, July 26, 2012

Going for the Gold-Cheese Straws

I love to cook and you might think with the title, that this post will be about hosting an Olympic Party.  Sorry--but it isn't about the Olympics.  It is about gold, though.  It's about CHEESE STRAWS--cooked to golden perfection.                                                               


It's about a favorite party goodie that we southern folks just love. 
If your having a tea, a coffee or a wedding here in the south,
you're going to want to serve your guests some cheese straws.
I have always admired the perfect cheese straw.
  A nice lady here in my town named Dorothy used
 to make the BEST cheese straws.  Hers were
 beautiful and perfect-tasting every time.
You could actually be at a social event and eat a cheese straw
 and know if Dorothy had made it.
Over the years, I have used her recipe and the recipe of
another sweet lady named Mary Lovett.  I have taken both of their
 recipes and combined them for the recipe I use today.
My sweet niece is getting married next Saturday and I am making the cheese
 straws for the reception.  I'm making a thousand.  That's right.  I want to make sure
 that every person who attends this event has several of my yummy cheese straws.
Here's what you'll need to make the cheese straws

3 cups flour
2 teaspoons baking powder
2 sticks of unsalted butter at room temperature
24 ounces of sharp cheddar cheese
1 teaspoon red pepper
1/2 teaspoon garlic salt
4 dashes hot sauce
(This recipe makes 200)


First, grate the cheese. 
 Yes, grating the cheese does better in the recipe
 than the pre-grated packages.

Cream the butter and add the cheese.

Mix the cheese and butter together.

Add the flour, baking powder, garlic salt, red pepper and hot sauce.
You can taste the dough and see if you want you make it with a little more spice.
Mix well.


You will need a press to make the cheese straws. 
I use a star tip to make the 2 1/2 inch long straws.
I eye ball it--and they seem to turn out pretty well.
Place the cheese straws on a greased cookie sheet.


Try to arrange the straws on the cookie sheet so they are nice and straight!
I make forty on each cookie sheet.

Bake at 350 for 12-14 minutes.  Bake on the top rack in the oven, one sheet at time.  Test for desired crunchiness at 12 minutes.  Return to oven if you want them to be a little crunchier.  

Cool on a rack. 
Store in air-tight containers.  Cheese straws may be frozen.


The perfect cheese straw is at home on
 pewter, a silver tray or a paper napkin. 

 I hope you'll try this recipe.  Let me know if you do!


Joining the Party at:

UndertheTableandDreaming


Rattlebridge Farm
Foodie Friday
Foodie Friday

Tuesday, June 19, 2012

World Traveler Coffee Table

I love to travel.  Do you? 

                                 I thought I would share my
                    world traveler coffee table with you today.  


I usually like to think about vacations to the beach in the summer months. I often like to express those thoughts by decorating my coffee table in my family room with shells, beach pictures and other beach-related items.  This year, I decided to try something a little different. I decided to use some things I have on hand to make what I'm calling a World Traveler Coffee Table.

I haven't painted my furniture, but I decided to lighten
 up the look of my coffee table by adding the linen
 table runner my grandmother made years ago. 


Here's a another view of the table runner.
  It adds a perfect lighter look to the coffee table.


Then I added to the table, this old globe that
 I can always remember being in our home.
  My mom said it is over fifty years old. 


I can remember that this dial on the top always fascinated
me when I was a little girl.  You could see where it was day
 and where is would be night just by the turn of your finger.


I found these vintage-style maps at a store recently.  I thought they might
look good on the table, too.  The magnifying glass came from
 the desk in my great-aunt's bedroom.  I don't know how
 old it is, but my aunt died in 2001 at the age of 100. 
The postcard is from a stack of vintage cards a friend gave
 me several years ago.  It is an old one of Panama City Beach, Florida.


Here are two vintage brochures from The Statue of Liberty
 and The Empire State Building.  I have visited both
 and was happy to find these at an estate sale several years ago. 
 The picture is my favorite one of my
daughter on the streets of New York City in 2011.


Now I have to show you this cute little table that I got for Mother's Day.
  I'd been looking for something like this and was delighted
when I found this on a shopping trip to Birmingham, Alabama. 
I love the distressed look and the yummy turquoise paint on the sides.


I was prowling around at my Mom's the other day, and we found
 this little book from Pompeii, Italy and several Italian coins. 
It brought back memories of a trip long ago that is still fondly remembered.
A piece of vintage sheet music completes the table top.


Here's a final look at my coffee table and the
 new look that I'm so enjoying this summer--Thank you, Blogland! 

What are you enjoying this summer? 
 The fresh fruit?  The sunny weather?  Photos from a recent trip?

I'd love to know what you are loving this summer!

Joining the party at:


Tuesday, June 12, 2012

Last Week, I Vacuumed a Typewriter

Blogging makes us want to try new thingsLike last week, I vacuumed a typewriter.
Yes, because of Blogland, I pulled this 1940 Underwood typewriter out of storage in our garage and I vacuumed it.
  I've seen a lot of typewriters in posts and I thought to myself.....
I have one of those in the garage. HUMMMM......


I decided to update the desk in our family room and
  used the typewriter as my starting point.


This is what my desk looked like before I started my project.


I took everything off the top of the desk and started over.
I borrowed this old wicker tray from my mom.  
It belonged to my great-grandmother.   
The other items are just things I already had in the house.


Here's a close-up of a picture that I already had on the desk. 
I decided it should stay because I haven't had it on the desk for very long.
I added the vintage bottle of ink that you can see on left corner below the picture frame.
Now the picture....this is a special picture. 
 It was made in 1962 of my great-aunt at the newspaper office in our town.
I think the picture looks great in the frame that looks like vintage newspaper type.
I can remember seeing type that looked like
 that in the newspaper office when I was a little girl.


Here's just the photo itself. 

If you look in the background to the right....do you see it?
YEP!  It's the desk!!!! 
The desk that is in my family room.

It used to be in the newspaper office years ago. 
 I can remember that it was dark and dirty
with ink when I was a girl.  But in the 70's (when I was a teen),
it was cleaned-up and refinished and it has been in
my home ever since.  And one  more thing
 about the desk....it used to belong to my great-uncle who
 was born in 1892 .  And, before that, the desk belonged to
HIS daddy and was in his law office...
so this desk is OLD!


Here's another shot of my changes.


I am enjoying the changes that I have made to the desk! 
And now I can say that I have vacuumed a typewriter!!

THANK you BLOGLAND!

Joining the party at:


vif187

Furniture Feature Fridays